|

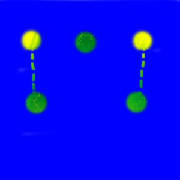
While in the wedge formation, if the pointman makes contact with the enemy, he will signal
for you to go into the cover postion. If the enemy is to your front, you will move as pictured here: In this position you are able to to fire upon the enemy without firing past you team mates.
If the enemy is to your front, and you are in the cover position, you may need
to move left or right without breaking off from the enemy. This can be done by flanking:
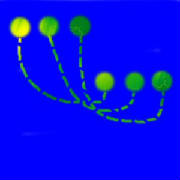
This of course can be
done to the right or left. One person at a time moves, starting from the side opposite where you want to go. The benefit of
this is that 2 of your men are always providing covering fire, even while you move.
I want to stress again that while performing any of these manuvers, it is critical
that you maintain your 'safe spacing' with your team mates. You must never 'bunch up'. Maintain your 10 yard or greater distance
at all times!
|
 |
|
This formation is used for patroling in areas where you are uncertain whether
or not the enemy is present.
While in this formation, you must maintain a 'safe' distance between you and your team mates.
This distance will of course vary depending on terrain, but the following things should always be considered:
Stay far enough apart and to the side so that one grenade or one machine
gun burst could not hit 2 persons at once. (10 yards is good.) Stay close
enough together to ensure that you will see hand signals or hear verbal commands from the team leader. Each person in the wedge covers the logical area for them. the man on the right covers the left flank,
the man on the left covers the right flank, and the pointman covers the front.(If possible it's a good idea to have a left-handed
person on the right side, and vise versa.)
|
|
|
|
|
|
|
|